
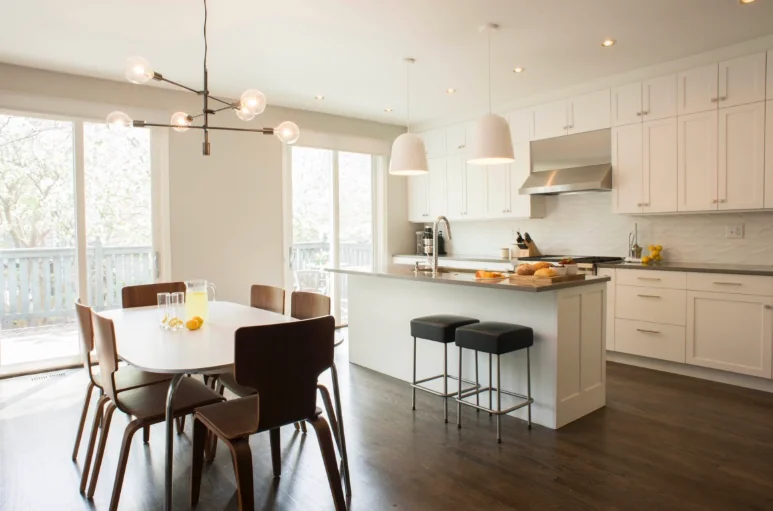
Plenty of homeowners have taped an island onto their kitchen floor before calling a designer. They have walked around it, opened the dishwasher into it, and found out the hard way that the rectangle that looked generous in a photo leaves a 34 inch gap where two people need to pass. That moment is useful. Good kitchen island design is mostly a negotiation between the piece you want and the floor you have, and the floor wins every time.
Work through an island in a fixed order: the space around it first, then its size and shape, then what it does, then who sits at it. Each decision narrows the next, and settling them in sequence keeps the finished island from looking wedged into the room.
The aisles decide the island, not the other way around
Start by drawing the paths, not the island. Every kitchen has a work aisle (between the island and the range, sink or refrigerator wall) and usually a walkway (the route people take to get through the room without cooking). These two paths have different jobs and need different widths.
The NKBA Kitchen Planning Guidelines set the minimum work aisle at 42 inches when one person cooks, rising to 48 inches when several share the kitchen, which keeps two people from turning sideways to pass. A walkway should be at least 36 inches wide. Those numbers are measured from finished countertop edge to finished countertop edge, not from the cabinet boxes, and they need to hold when the appliances are open. A full-depth dishwasher door or a wall oven door dropped into a 42 inch aisle leaves very little room for anyone standing at the island behind it.
Once those paths are drawn, whatever floor is left in the middle is your maximum island footprint. It is often smaller than people expect. In a lot of Chicago condos and older homes, the honest answer is a narrower island, a shorter one, or a peninsula that borrows a wall instead of floating free.
Kitchen island size should follow the room’s proportions
A kitchen island size that works on paper can still look wrong in three dimensions. Two proportions matter most.
The first is length relative to the run it faces. An island that roughly mirrors the length of the main counter wall reads as part of the architecture. One that overshoots the wall at both ends starts to feel like furniture parked in the room, and one that is much shorter can look stranded. Letting the island stop a little short of the perimeter run on each end usually looks right, which also gives traffic a softer corner to round.
The second is depth. Many work islands land somewhere around 36 to 42 inches deep. Add seating on the far side and you are closer to 48 inches or more. Go much past that and the center of the top becomes a place where things get pushed and forgotten, because nobody can reach it from either side. Deep islands also eat aisle width quickly, which sends you back to the first step.
There is a practical ceiling too. Stone slabs only come so long, and a very long island often means a seam or a deliberate change of material. Plan that break as a design move, such as a change in height or a wood end section, so it never lands wherever the slab happens to run out.
Decide what the island is for before you draw it
The island’s job shapes its plumbing, electrical and the layout of the whole kitchen, so this decision belongs early in the space plan. There are three common versions, and each one asks for something different.
A prep island
This is the simplest and often the most useful. A long, uninterrupted surface facing the range gives you a place to chop, plate and spread out while staying turned toward guests. Storage below can be built around exactly what you prep with: knives, boards, mixing bowls, the sheet pans that never fit anywhere. A prep island with a small secondary sink is a strong choice for households that cook seriously and want the main sink to stay on the perimeter.
A sink island
Moving the main sink to the island puts the person washing up face to face with the room instead of a wall. It also means the dishwasher, trash and the mess on the counter around the sink are visible from the living area. If the kitchen opens to a family room, that trade deserves a hard look. When it works, the sink sits on the cooking side with clear counter on both sides, and the seating sits at the far end or on the opposite face, out of the splash zone.
A cooktop island
Cooking at the island is the most demanding version. It needs ventilation that works from the ceiling or from below, a clear path for the duct, and landing space on both sides of the cooking surface. Seating directly across from a cooktop is rarely a good idea; keep stools away from the burners or separate them with a deep buffer of counter. In condos, venting routes often settle this question before any design preference does, so confirm them with the building early.
Whichever job you choose, make the island do one thing well. Islands that try to hold the sink, the cooktop and four stools usually end up doing all three badly.
Torn between a sink island and a prep island, and unsure how either one would ripple through the rest of the kitchen? Bring a designer in now, while the answer is still a pencil line. Threshold Design Lab can look at your floor plan with you during a no-charge first consultation, in your kitchen or over video.
Kitchen island seating needs its own clearances
Kitchen island seating is where a plan that looks fine on paper most often fails in real life. Each seat needs width, knee space and room behind it.
The same NKBA guidelines allow a knee space 24 inches wide for each seated diner. Four stools need around eight feet of seating edge, which is more than many islands can give once the ends are trimmed back for circulation.
Knee space depth depends on height. At a 36 inch counter, the guidelines allow 15 inches. At a 42 inch bar height, 12 inches, because the stool raises the sitter. At a 30 inch table height, 18 inches. Too little overhang and people sit sideways with their knees against the cabinet doors.
Behind the stools, think about what happens when someone is sitting there. If nobody needs to pass, the guidelines allow 32 inches from the counter edge to a wall or other obstruction. If traffic passes behind seated guests, they call for at least 36 inches to edge past and 44 inches to walk past. That measurement often tells you whether seating belongs on the long side of the island, the end, or not at all.
Height is also a design decision, not just an ergonomic one. A single counter height keeps the island calm and gives you more usable surface. A raised bar ledge hides prep clutter from the living area but splits the top into two narrower zones that are harder to use for buffets or homework. Keep the top on one plane unless there is a clear sightline problem to solve.
When two islands, or an island and a table, work better
Some of the best kitchen island ideas involve less island, not more. If the floor plan has room for a very large island, ask whether two smaller pieces would serve the household better.
Two islands make sense in larger kitchens, common in North Shore homes, where one island can be the working surface near the range and the second can be the gathering surface with seating, a beverage zone or a buffet top for entertaining. Each can be sized to a comfortable reach, and the aisle between them becomes a natural pass-through. The risk is crowding; two islands need all the clearances of one, plus a generous aisle in the middle.
A table-height extension is another strong option, especially in open plans. The working part of the island stays at counter height, then steps down to a table at its end. You get chairs instead of stools, a place where people actually linger over dinner, and a softer transition between the kitchen and the living area. In a condo where a separate dining table would crowd the room, this can do the work of both.
And sometimes the right island is a peninsula. Attaching one end to a wall frees up an entire aisle, keeps seating out of the cook’s path and still gives you a large surface. In tighter Chicago kitchens, the peninsula is often the layout that turns a cramped plan into a generous one.
Lighting and finishes make the island read as part of the room
Pendants over an island are placed by the island, not by the ceiling joists. Center them on the top, keep them clear of where tall people stand, and size them so they relate to the length of the island rather than filling it. Two larger fixtures often look calmer than four small ones. Pendants are only part of it; the island still needs even ambient light so the surface is not shadowed when someone leans over it.
Finish choices are where the island can step forward or settle back. A contrasting color or a different stone can make the island the anchor of the room, which works when the perimeter is restrained. When the kitchen opens onto a living space, it helps to detail the seating side more like furniture, with panels, a furniture base or a change of material, so the side guests see does not look like the back of a cabinet run. The same sequencing of surfaces, lighting and utilities described in these elements of kitchen design applies to the island, just concentrated into one object.
Carrying the island from drawing to build
The island is usually the most coordinated object in the kitchen. It may carry plumbing, a dishwasher, outlets, a cooktop circuit, a duct and a stone top, all landing in the middle of the floor where none of those services already exist. Resolve it on the space plan and elevations before anything is ordered. When the people who drew the island also manage the trades and the install, a question about outlet placement or a seam location gets answered against the drawing, not improvised on site, and small problems can turn into better details: outlets tucked inside a drawer so the island ends stay clean, or a shallow cabinet built into the seating side for placemats and cookbooks.
At Threshold Design Lab, our residential interior design work takes an island from the first clearance sketch to the day the countertop is templated and set, and the Barry condo kitchen and bath remodel is one finished example. For the cabinetry runs, lighting and storage around the island, see what a kitchen interior designer looks after in the rest of the room.
The right island fits the way you live
An island should make the kitchen easier to cook in and easier to be in. Draw the aisles first, size the island to what is left, give it one clear job, and plan seating with real clearances behind it. If the numbers do not work, a smaller island, a peninsula or a table extension will almost always serve you better than squeezing in the island from the photo.
Have a kitchen plan in progress with an island you are not sure about? Send it over before the stone is ordered. Book time with our designers, free for the first consultation, or speak with us directly on (773) 433-0042.
Frequently Asked Questions
How big does a kitchen need to be for an island?
There is no single minimum, because the answer depends on what surrounds the island. A practical test is whether you can keep about 42 inches of clear aisle on the working side and at least 36 inches on the others after placing even a small island around 2 feet by 4 feet. If you cannot, a peninsula or a movable work table is usually the better choice.
Should an island be the same height as the rest of the counters?
In most kitchens, yes. A single height gives you the largest usable surface and the calmest look. A raised ledge is worth considering only when you need to screen a sink or prep area from an adjoining living space, and a lowered table-height section works well when you want chairs and longer meals at the island.
Can you put a dishwasher in a kitchen island?
You can, and it is common with a sink island. Plan for the open door to land fully in the aisle without blocking the main walkway, keep the dishwasher next to the sink, and leave standing room beside it so someone can load it while another person passes. The plumbing and drain route through the floor should be confirmed before the island position is final.
What shape of island works best in an open plan?
Rectangular islands are the most efficient for storage and seating. In open plans, a long rectangle running parallel to the living area tends to work best because it creates a clear edge between the two zones. Curved or angled islands can help traffic flow around a corner, but they make seating and storage less efficient and are harder to light evenly.
How many pendants should go over a kitchen island?
The fixture count depends on the island’s length and the size of the fixture, not a fixed rule. Islands under about 7 feet often look best with two pendants, longer islands with two larger fixtures or three medium ones, and very long islands with a single linear fixture. Keep the end pendants set in from the ends of the top so the light falls on the work surface rather than the floor.